

I mentioned in my last post that like many people, since Lighthouse v9 was released, my blazing fast, green-100 GatsbyJS site on language learning was barely managing to achieve orange.
I'm not the only one it seems.
The Core Web Vitals performance requirements have been really hard on Gatsby and other JS bundled sites.
Google Search Console’s “Page Experience” shows:
Your site has no URLs with a good page experience
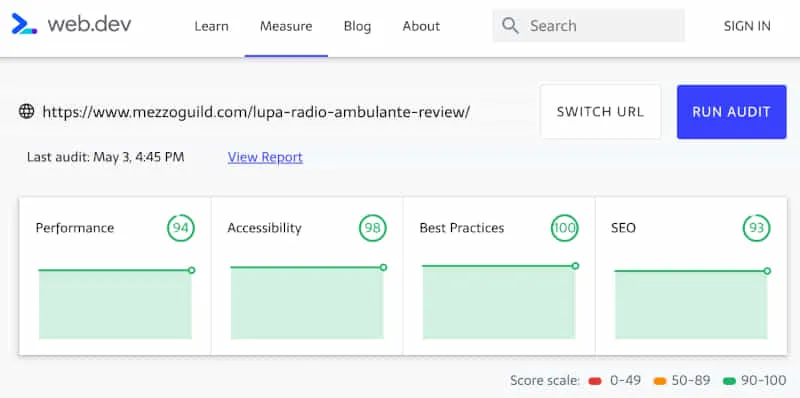
For this reason, I redeveloped my personal blog (the one you’re reading) with 11ty to test the performance difference.
The results: 11ty destroys Gatsby on performance.
This makes sense since all 11ty does is generate a plain old, regular HTML + CSS site with no added extras or JS bundling unless you choose to add it in yourself.
But I wasn’t satisfied with just abandoning GatsbyJS and React on my bigger sites (I’ve fallen in love with it), so I spent the last few weeks tweaking and optimizing like mad to see what I could achieve.
I’m happy to report that I seem to have mostly achieved green 90+ scores on my large GatsbyJS site (not all pages though which I’ll explain below).
I thought it might be helpful to summarize some steps I took to make it happen in case anyone else is struggling.
If you have a 3 page portfolio site, then you don’t get to lecture anyone on speed
So you have a pretty portfolio page with a bio and contact form, and you’ve achieved a 95+ green performance score?
That’s not an achievement, my friend.
Way too many boasts of high performance on sites that weigh nothing.
I have several Gatsby sites now that have at least 500 posts each, average 2000+ word articles, full of images, videos, podcasts, audio components to play language snippets, and so on.
Heavy stuff.
Some might even argue that Gatsby is unsuitable for sites like mine.
Perhaps.
But I have managed to greatly improve speed and achieve a fairly consistent green performance score on most pages.
With the Google Core Web Vitals algo update approaching, I think I’m safe.
Here’s what I’ve done.
How to tweak and optimize GatsbyJS for Core Web Vitals and green perf scores
I’ll share some steps I took in no particular order.
Some of this is probably no-brainer stuff for experienced React devs. I’m quite new to React myself (only 2+ years so far) so still discovering best practices.
Take bundle size seriously
When you first start out with Gatsby (and indeed React), you tend to go a bit crazy adding node packages.
Node packages and Gatsby plugins are bit like shopping on an app store - you see a bunch of cool, useful stuff or things like utility libraries that save you time and add them without realizing the cost.
A well-known example is lodash.
Importing the entire lodash library is a costly mistake - the first one I rectified.
Instead of importing the whole thing - import what you need specifically.
Or don’t import it at all and see if you can simplify whatever you’re doing with a custom utility.
In my case, I had also added bulky icon packages (because I needed one or two svg icons), framer motion for basic animation stuff that CSS was perfectly capable of doing, progress bars, emojis and so on.
All this stuff adds up to literally megs of bundle size.
For this, I highly the gatsby-plugin-perf-budgets plugin to analyze your bundle in great detail.
Cutting this down is one of the easiest quick wins you can make.
Clean up and trim your code
When you build a site with 11ty, Jekyll or Hugo, your templating code is rendered into HTML.
Doesn’t really matter how messy or convoluted your template is - it’ll output a HTML document and nothing more.
So no issues.
With Gatsby, you end up with a static HTML page that is hydrated with React and all that messy, shitty code you wrote directly affects how well this performs.
If, like me, you have a boatload of confusing logic (e.g. lots of conditional rendering stuff), you can expect it to hurt your site’s performance as the browser has to work extra hard to parse it all.
Your coverage tool will show lots of red unused JS too.
Simplify your code as much as possible, remove repetitive code, try to do more with less.
This has a direct effect on Google’s remove unused Javascript complaint which hurts your perf score big time.
Don’t use styled-components - switch to Linaria or CSS Modules
The verdict is in on this one.
I love styled-components (and emotion) but it sucks balls for performance on a site with lots of components like mine.
Removing styled-components completely and switching to Linaria immediately increased my Lighthouse perf score by at least 20 points.
Linaria is still kinda buggy. I kept getting the Gatsby white screen of death when using it if there was a syntax mistake or when passing style props to an MDX component, but it displayed no console errors to help me diagnose what the problem was.
Plus you get a crapload of irritating “conflicting order” warnings (mini-css-extract-plugin) that you need to disable using webpack (safe to do so).
The reason why I chose Linaria over CSS Modules is that I could continue styling the same way I did with styled-components (e.g. const Component = styled.div) but instead of having the style bloat up the page in the browser, the CSS is extracted and scoped.
Best of both worlds.
Note: it will slow down build times a little.
MDX is a blessing and a curse
I absolutely love MDX.
The problem is - when you import an MDX component in a blog post, you need to remember that it gets bundled with your whole app/site.
It’s not scoped to that page.
I had at least half a dozen fairly heavy MDX components I was using that were weighing the whole site down.
It’ll add to your “unused Javascript” issue.
There is a hacky way around this.
Firstly, don’t use import statements inside your MDX files.
This was a mistake of mine - every time I’d write a post, I’d import my components at the top of the article.
Remove these, and create a separate MDXComponents file, then pass that as a components prop to your MDXProvider.
In your MDXComponents file, you can then lazy load those individual components.
This is where loadable-components comes in.
You can use loadable-components here but there is one major caveat (perhaps it’s a bug/issue that should be raised).
Unfortunately, you can’t use gatsby-plugin-loadable-components-ssr if you do this - the components must be client-side only or it’ll throw errors at you.
So the upside is: you can lazy load MDX components and stop them weighing your site bundle down.
The downside is: you can’t server-side render them for SEO value.
This is great for audio play components and so on, terrible for any textual data that you want to get indexed by Google.
Use the hell out of loadable-components
While I’m on the matter of loadable-components, use it a lot.
It’s even listed in the Gatsby docs as their recommended method for lazy loading.
If you’ve got components toward the bottom of your page, they should be lazy loaded.
Things like: recommended articles, footers, dark mode switches, opt-in forms and so on.
If they’re not in the viewport, they shouldn’t be loaded yet.
Bear in mind, if you took my advice on MDX and loadable-components and can’t use the SSR plugin, then you don’t want to use loadable-components on anything that is SEO-beneficial.
Inline critical SVG components and then use a standard <img> tag (not require)
This was a huge mistake for me.
My site uses hundreds of SVG’s. Lots of flags, product logos and so on.
I was originally inlining all of them using custom SVG components (with props). This meant that my site’s bundle was suffocating.
You should only use inline SVG’s for critical SVG’s at the top of the page that need to load instantly.
All other SVG’s should be added using <img> tags.
Also, don’t use require inside the <img> tag because it will turn your SVG into a base64 image which increases the size of your page.
Move your SVG images to a folder in /static/ and reference them that way.
For background SVG’s, use base64.
React hydration is the primary killer of TBT in Gatsby sites
Total blocking time.
It’s the hardest metric to please with a Gatsby site.
The reason for this is that React hydration kicks in after the HTML is loaded and there’s a brief period of “white” (you can see this in the Performance tab of Chrome Dev tools) that delays interactivity.
To improve this, use Lazy Hydration on sections of your site.
I managed to get my Total Blocking Time down from 1,500+ to about ~250 by lazily hydrating large sections of my page.
Use it carefully though - I had a few instances where sections of my page just didn’t appear at all on load.
LCP and CLS are design issues
These are the easiest metrics to fix.
For LCP, ensure that the largest piece of content in the viewport (usually headings or a large image) are loaded instantly and visible.
You don’t want any period of blank white to show.
This might mean that you need a redesign to get rid of large hero images (the primary culprit for LCP problems).
In my case, I actually have a media query on my review posts that hides the image completely on mobile and only shows the text heading and subtitle.
This is a design issue that you need to play around with.
For CLS, just make sure that nothing moves while it’s loading.
Don’t have dynamic components loading up top or on the navbar (I actually moved my dark/light mode switch to the footer because it had a slight delay in my navbar and pushed elements around, hurting my CLS).
It’s another UI/UX call that you’ll need to play around with for best results.
Take a good look at your queries
One of the things that caused a big delay for me was my comment query.
I use a custom, Git-based comment system where comments are stored in JSON format, and then I run a GraphQL query to find comments for specific posts at build time.
Originally, I was using a static query for this and had all my comments in one giant JSON file (8000+ comments!).
So I manually extracted all the comments and put them into their own individual comments.json files, then I removed the static query and ran a page query instead.
Basically what this means is that each page has its own comment data that doesn’t affect the rest of the site.
NOTE: I still need to address this because some posts have hundreds of comments which means my page data for that specific post is huge. I may end up needing to paginate the data or load it dynamically.
Another example was my recommended posts component which queried every post on my site to find related posts to display. Unfortunately, this created a huge query in my bundle. I’ve removed it entirely but may end up finding an alternative method.
Lesson here for you is to try and pay attention to the queries you make and ensure that whether they’re static or page queries, they aren’t causing bloat.
Green perf scores can be achieved on large Gatsby sites but it’s going to take a lot of patience on your part
Some pages on my site aren’t there yet.
I’ve focused primarily on my blog posts, resource pages and review posts which are the most important for SEO.
It’s extremely time consuming tweaking and testing these things.
Make sure you only test on throttled 3G - nothing else matters. Desktop testing is a waste of time because Google doesn’t consider it anymore.
Focus on mobile. In 2021, everything is mobile-first.
If I have more results or discoveries as I tweak and optimize, I’ll update this post with my findings.


Comment Policy: I can handle harsh criticism and disagreements, but if you're disrespectful or a self-promoter, your comment ain't gettin' published.